These principles explain why conciseness and clarity are essential for high-performing agents.
Token Cost: Verbose explanations multiply token usage across many interactions
Signal-to-Noise Ratio:
Excessive detail dilutes critical information
Agents may struggle to identify which rules are most important
Too many examples can distract from the core pattern
Processing Overhead:
Longer documents = more cognitive load
Simple, direct imperatives are faster to process than lengthy explanations
Actionable Best Practices
Be Concise: Eliminate verbose statements and any language or content that is only relevant to human readers.
Focus on New Learning: Only insert rules that correct known AI mistakes or introduce "new" learning. Rules the AI can already generate on its own are typically noise.
Avoid Redundancy: If a rule or principle is stated clearly once, do not repeat it.
Use Minimal, High-Quality Examples: One good, representative example is more effective than three similar ones.
Prioritize High-Level Abstraction: Focus on stable, high-level principles over low-level, volatile details like method names.
The Maintenance Burden
Focus on Backbone Principles: Guide the AI with high-level, enduring principles rather than specific, volatile details. Code evolves quickly, and outdated specific guidance becomes a maintenance burden and can actively mislead the AI.
Team Maintainability: Long, verbose AGENTS.md files create maintenance problems:
Developers overwrite each other's rules without noticing
Hard to tell if changes improve or degrade agent performance
Outdated specifics mislead the agent
Conclusion
A well-crafted AGENTS.md is a powerful tool for developing highly effective AI agents. If you let AI generate the AGENTS.md, try creating AGENTS.md using the following rule:
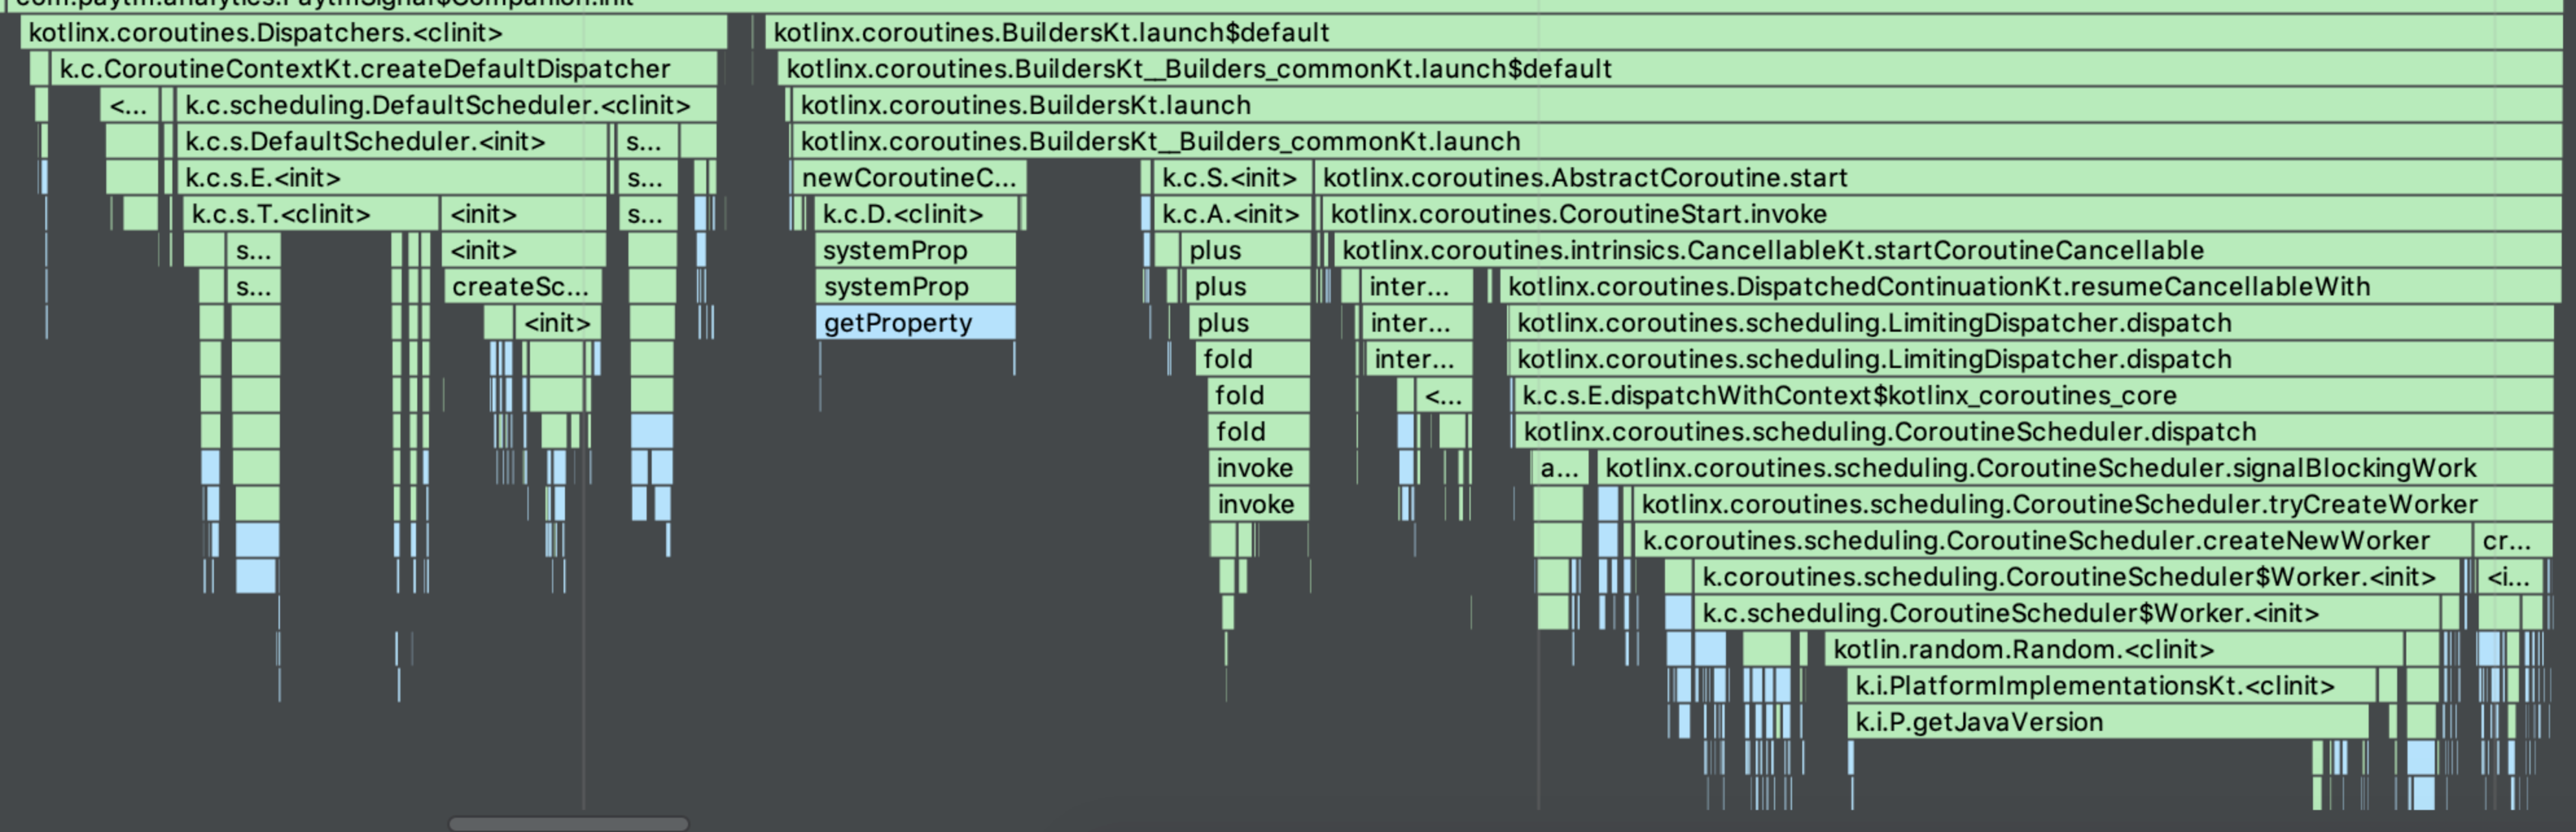
Coroutine takes longer at the very first call. However, it becomes significantly shorter to switch after the first.
Coroutines is the next gen excellent Library. However, it comes with the price of the initialization time. We try to use Coroutine as much as possible. However, just to maximize the initialization performance, we are avoiding to use it during the initialization: application.onCreate(), and the launcher activity.onCreate().
Not much difference between Thread & ThreadPool (They will eventually make a difference when more and more thread switches happens)
This is a summary of what I have been learning about Network Security from an Android developer perspective. How to enhance your mobile security.
Why is SSL/TLS required? What is a man-in-the-middle(MitM) attack?
Without the SSL/TLS end-to-end encryption, a hacker can:
See your user name, password when you login
See your auth token for any API calls you make to the server
Alter information so that you could send money to the wrong account (see above image)
SSL vs TLS
SSL was replaced by TLS. TLS is the superior version of SSL. Although SSL should no longer be used, the name is still widely being used.
SSL version updates
The SSL version has been updated from SSL 1.0, 2.0, 3.0 to TLS 1.0, 1.1, 1.2, 1.3. The security vulnerabilities continuously have been found and updates have been made. GlobalSign warns to disable TLS 1.0 and below. There are more and more enforcements for payment services to use at least TLS 1.2. Stripe, for example, blocked below TLS1.2 as of June 13, 2018.
Headache of supporting minimum TLS version
So what’s the issue? Just use the highest TLS version. There’s an issue for older devices.
TLS 1.2 was supported on devices with android API levels on 16+(4.1) but was only enabled by default on devices on level 20+ (5.0).
For devices below Android 5.0, it is up to each Manufacturer to include TLS 1.2 support or not.
If you upgrade the server to support TLS 1.2+, then you will encounter the TLS version not supported issue for Android 4.x devices. You can simply make the minimum Android SDK version to 5.0. However, if you still want to support Android 4.x devices, some users will be able to download from the Play Store only to find out their device is not supported (due to the manufacturer not including TLS 1.2 support). This will result in bad Play Store ratings.
There is a way to programmatically detect if the TLS version is supported or not. You should throw some type of appropriate minimum security requirement error message.
This headache will happen once again in the near future when the TLS 1.3 becomes the minimum requirement.
Minimum TLS versions
Refer following for TLS version support per Android version:
During the handshake, the server verifies the client and the client verifies the server. How does the client know the server is who they say they are? If you’re buying a house, how do you know if the seller is the true owner of the house? You have to ask some sort of trusted authority (government) to verify the house is truly owned by this seller. This “trusted authority” is the Certificate Authority(CA) for networks. What if the seller brings the fake government verification paper to you and you have no idea if it is a fake or not? Likewise, if the wrong root certificates are added on the device, then this “fake” certificate will be trusted.
Charles
Charles is widely used for the debugging and analyzing. Charles can see the unencrypted contents by installing it’s own root certificate and making the device (or browser) trust the certificate.
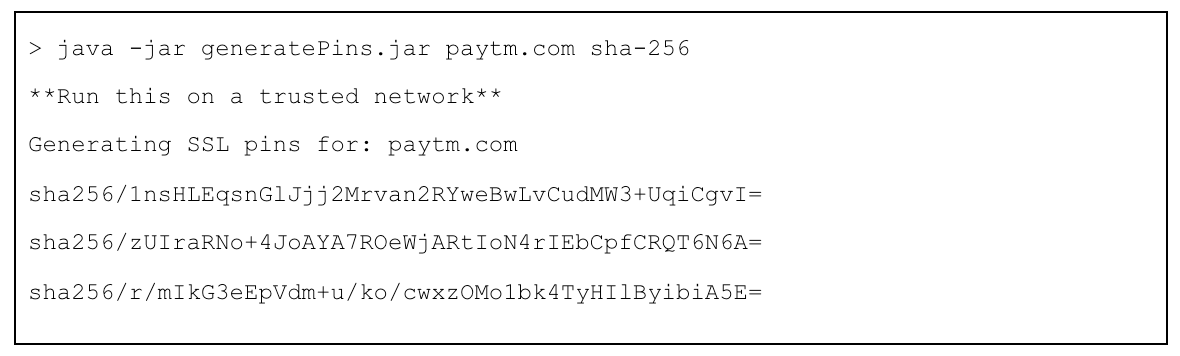
SSL Pinning comes to rescue
By providing the “true” server public key information, you can restrict the application to only trust the provided public keys for certain domain names.
For example, if the domain name starts with *.example.com, trust it only if the public key is SHA256/AAA. Hackers cannot* create a certificate with the same public key.
When the hacker tries the man-in-the-middle(MitM) attack, the application will result in SSL Pinning mismatch and throw an exception.
Certificate Expiry
Certificate expires. We don’t want older app versions to stop working because the server certificate is renewed. So you might want to avoid hardcoding the SSL pin inside the application code. Make it so that it dynamically downloads the SSL pin from the server.
There may be many meanings tied to the "offline-first" architecture. The definition here means the app always loads from the cache "first" for the fast performance. Once the data from the cache is displayed, it updates again the difference (if any) using the data from the server.
Result: Even if getting information from the server is slow, the app instantly loads the screen from the cache instead of showing the "loading" screen. Also, if the device is offline, the app will still work as long as there is a cache data (the page has been loaded before).
Folder Structure
I have grouped Fragment & ViewModel into one folder but separated the Repository into different folders.
Reason:
In most cases you will have 1-to-1 ViewModel per Fragment. However, sometimes data(repository) can be shared between different View/ViewModels.
For example, both User List and User Detail screens share the same User data.
ViewModel <-> Repository Relationship
With the typical MVVM architecture, the Repository offers the suspend function and the ViewModel will have the LiveData calling for the data.
For offline first architecture we will have the Repository returning the "streams" of data which is called Flow. Flow allows it to return data more than once.
Flow
Flow is similar to RxJava. The learning curve, in my opinion, is lower than the RxJava. Like RxJava, Flow also offers very useful operators like zip, combine, flatMapConcat, flatMapMerge, debounce, onStart, onComplete, etc. The fact that Flow can be directly converted into LiveData makes it really easy to adapt if your project already uses the MVVM architecture with LiveData.
Two-tier Cache
I use two-tier cache:
1. Memory Cache
2. Local Cache (DB or SharedPreference)
There are advantage and disadvantage of using two-tier cache:
Advantage:
Speed: Even reading the local DB takes time. It requires you to switch the worker thread. Coroutine has made the thread switch much faster than the original way but it can still cause the UI flickering issue during the page load. The flickering issue is more evident when the placeholder UI is not empty and the height is different from the UI with data. This is caused by the thread switch: UI (show placeholder UI / trigger event) -> Worker (read data) -> UI (display result). Reading from the memory can be done on UI thread without switching the threads.
Disadvantage:
Complexity: It adds an extra complexity to maintain two caches up-to-date with the latest data.
Out of memory error: If you're working with the large size data, having all of them to be saved onto the memory cache does not make sense. They will eventually add up and the app will run out of memory. So you have to define the "scope" of how much and how long data should be saved on to memory. For example, you can create the memory cache as a LRU memory: only saving the last used data up-to the cache size pre-defined. You can also set a time limit. Some data is no longer valid after a certain time. You can wipe the cache data after a certain time so that the new data from the server has to be called.
2 Types Of Read Call
There are two types read call:
Cache-and-server: First read from the cache (either memory or local) and return the result. Then read from the server and update the difference.
Cache-or-server: If data from the cache exists, then return the cache data. If cache has no data, then return the data from the server.
Cache-and-server
Following is a simple example cache-and-server read using Flow.
    override fun getUsers(): Flow<ArrayList<User>?> {
        return flow {

            // To show the data quickly as possible, first show data from cache, then from server

            var hasCacheData = false
            // 1. Emit first from either from memory or local
            // Memory
            if (currentUserList != null) {
                hasCacheData = true
                emit(currentUserList!!)
            } else {
                // Local
                val localCache = myDao.getUserList()
                if (localCache.isNotEmpty()) {
                    val users =
                        ServiceLocator.getGson()
                            .fromJson(localCache[0].payload, UserList::class.java)
                    if (users?.value != null) {
                        // Save to memory
                        currentUserList = users.value!!

                        hasCacheData = true
                        emit(users.value!!)
                    }
                }
            }

            // 2. Emit again from the network (for the latest update)

            // Network
            val apiResult = ServiceLocator.provideJsonHolderService().getUsers()

            // Saving to DB takes time. Create another thread to save to DB.
            GlobalScope.launch(Dispatchers.IO) {
                saveToLocal(apiResult)
            }

            // Do not overwrite cache value with null network value (offline case)
            // If cache has no data, then it's ok to return null.
            if (apiResult != null || !hasCacheData)
                emit(apiResult)


        }.flowOn(Dispatchers.IO)
    }
Cache-and-server method is useful for the first time launch. The app can display the screen almost instantly with the data in cache and then apply the difference soon after (if any). Also, since it displays data from cache first, the app displays the result fast even if the device is offline or in a low connectivity state.
Cache-or-server
Following is a simple example cache-or-server read using Flow.
override fun getUsersAllowCache(): Flow<ArrayList<User>?> {
    return flow {

        // If cache is found, don't try to download from server

        // 1. Memory
        if (currentUserList != null) {
            emit(currentUserList!!)
        } else {
            // 2. Local
            var hasLocalData = false
            val localCache = myDao.getUserList()
            if (localCache.isNotEmpty()) {
                val users =
                    ServiceLocator.getGson()
                        .fromJson(localCache[0].payload, UserList::class.java)
                if (users?.value != null) {
                    // Save to memory
                    currentUserList = users.value!!

                    hasLocalData = true
                    emit(users.value!!)
                }
            }

            if (!hasLocalData) {
                // 3. Network
                val apiResult = ServiceLocator.provideJsonHolderService().getUsers()

                // Saving to DB takes time. Create another thread to save to DB.
                GlobalScope.launch(Dispatchers.IO) {
                    saveToLocal(apiResult)
                }
                emit(apiResult)
            }
        }
    }.flowOn(Dispatchers.IO)
}
Cache-or-server method is useful for the screen re-entry or when you know you don't need an updated value from the server.
Continuous Update From Server
Examples like current stock price or a number of likes in a post requires to be frequently auto refreshed. This can be done using the while loop and the delay:
override fun getUsers(): Flow<ArrayList<User>?> {
    return flow {

        // To show the data quickly as possible, first show data from cache, then from server

        var hasCacheData = false
        // 1. Emit first from either from memory or local
        // Memory
        if (currentUserList != null) {
            hasCacheData = true
            emit(currentUserList!!)
        } else {
            // Local
            val localCache = myDao.getUserList()
            if (localCache.isNotEmpty()) {
                val users =
                    ServiceLocator.getGson()
                        .fromJson(localCache[0].payload, UserList::class.java)
                if (users?.value != null) {
                    // Save to memory
                    currentUserList = users.value!!

                    hasCacheData = true
                    emit(users.value!!)
                }
            }
        }

        // 2. Emit again from the network (for the latest update)
        // If API call is like a current stock price, we should auto refresh every 1 seconds. Then we use "while" loop with "delay(1000)"
        while (true) {

            // Network
            val apiResult = ServiceLocator.provideJsonHolderService().getUsers()

            // Saving to DB takes time. Create another thread to save to DB.
            GlobalScope.launch(Dispatchers.IO) {
                saveToLocal(apiResult)
            }

            // Do not overwrite cache value with null network value (offline case)
            // If cache has no data, then it's ok to return null.
            if (apiResult != null || !hasCacheData)
                emit(apiResult)

            delay(1000)
        }


    }.flowOn(Dispatchers.IO)
}
The while loop will stop when there is no more observer (i.e. screen change).
ViewModel
The ViewModel code can be as simple as following:
fun getUserList(): LiveData<ArrayList<User>?> = userRepo.getUsers().asLiveData()
Use .asLiveData() to convert a Flow into a LiveData.
Using .onStart(), .onEach(), and .onComplete(), the viewModel can display the spinner: